Website and Certification Monitoring With Zabbix 7
In this post, I’ll show you how I set up a check for my website and the certification. I’m using Zabbix 7 and Zabbix 7 agent 2 on Debian 12.
Website monitoring
Info: To perform web monitoring Zabbix server must be initially configured with cURL (libcurl) support.
I just want to perform a few quick checks to make sure the site is up and running, that the content is there and that it’s performing well.
Synthetic end-user web monitoring with Zabbix 7.0
Since Zabbix 7.0 came out, there’s been a lot more we can do than what I’m showing here. Previously, when we were doing a typical web monitoring check, we just used cURL to get the source code, check the HTTP status codes and strings, response time and availability. The new feature is more a Selenium like monitoring. So, these are the new possibilities:
- Defining flexible multi-step browser-based scenarios
- Capture screenshots of the current website state
- Collect and visualize website performance and availability metrics
- Extract and monitor any data from your web application
- Analyze the collected data and receive alerts related to any discovered problems
What do we get?
This is what you can expect to see collected in any web scenario:
- average download speed per second for all steps of whole scenario
- number of the step that failed
- last error message
- download speed per second
- response time
- response code
Configuration
Web monitoring works through web scenarios. They consist of one or more HTTP requests. These steps are periodically executed by the Zabbix server in a pre-defined order. You can attach web scenarios to hosts/templates in the same way as items or triggers.
Create new web scenario
- Go to ”Data collection” and “Hosts” submenu
- Click on “Web” in the line of the host on which you want to set up the check
- Click on ”Create web scenario” in the upper right corner
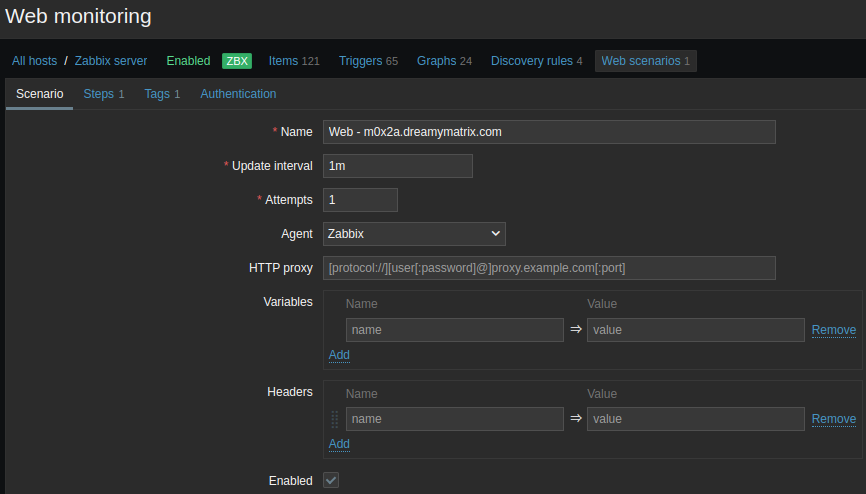
Tab “Scenario”
- “Name”: Choose a name for your scenario e.g. Web - m0x2a.dreamymatrix.com
Tab “Steps”
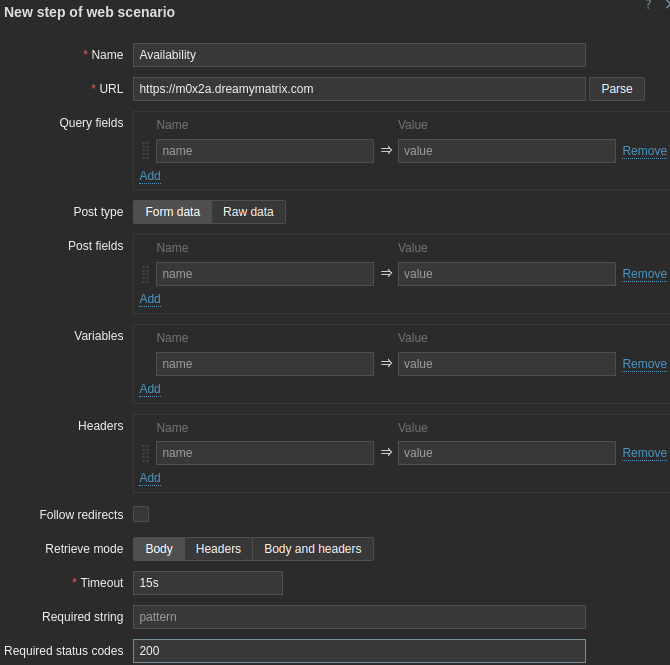
- “Add” new step
- “Name”: Availability
- “URL”: https://m0x2a.dreamymatrix.com
- “Required status codes”: 200
- “Add” new step
- “Name”: Content
- “URL”: https://m0x2a.dreamymatrix.com/about
- “Required”: Disclaimer
- “Required status codes”: 200
Tab “Tags” (Optional)
- “Name”: Application
- “Value”: Web monitoring
Now save the completed web monitoring. To view information about the web scenario, go to “Monitoring” and “Hosts” submenu, locate the host in the list and click the “Web” hyperlink in the last column.
Latest Web scenario data: 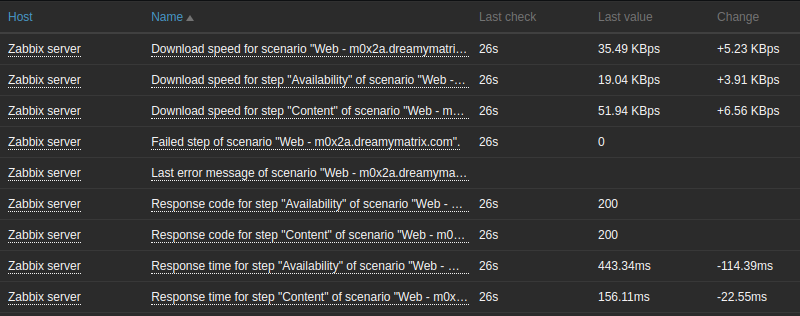
Web certification monitoring
We’ll set this up especially for the expiration date, so we’ll get an alert if something goes wrong with the Let’s Encrypt renewal. This won’t work with Zabbix Agent (1) because it uses the WebCertificate plugin built into Zabbix Agent 2.
We can try to test availability directly from the command line: zabbix_get -s 127.0.0.1 -k web.certificate.get[m0x2a.dreamymatrix.com,443] In return, we get a JSON object with all the attributes of the certificate.
What do we get?
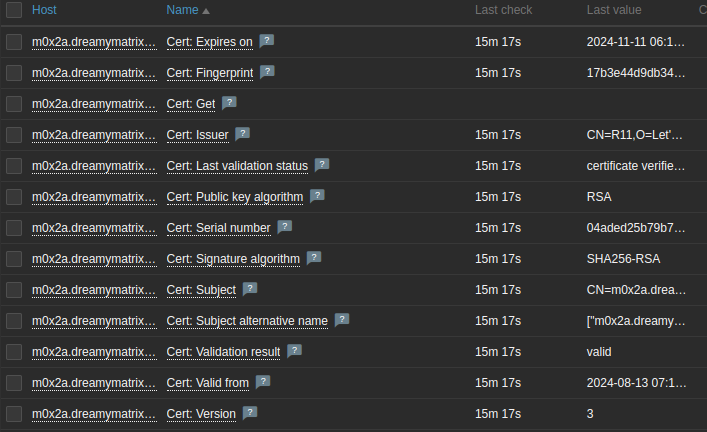
- Cert: Expires on - The date on which the certificate validity period ends.
- Cert: Fingerprint - The Certificate Signature (SHA1 Fingerprint or Thumbprint) is the hash of the entire certificate in DER form.
- Cert: Get - Returns the JSON with attributes of a certificate of the requested site.
- Cert: Issuer - The field identifies the entity that has signed and issued the certificate.
- Cert: Last validation status - Last check result message.
- Cert: Public key algorithm - The digital signature algorithm is used to verify the signature of a certificate.
- Cert: Serial number - The serial number is a positive integer assigned by the CA to each certificate. It is unique for each certificate issued by a given CA. Non-conforming CAs may issue certificates with serial numbers that are negative or zero.
- Cert: Signature algorithm - The algorithm identifier for the algorithm used by the CA to sign the certificate.
- Cert: Subject - The field identifies the entity associated with the public key stored in the subject public key field.
- Cert: Subject alternative name - The subject alternative name extension allows identities to be bound to the subject of the certificate. These identities may be included in addition to or in place of the identity in the subject field of the certificate. Defined options include an Internet electronic mail address, a DNS name, an IP address, and a Uniform Resource Identifier (URI).
- Cert: Validation result - The certificate validation result. Possible values: valid/invalid/valid-but-self-signed
- Cert: Valid from - The date on which the certificate validity period begins.
- Cert: Version - The version of the encoded certificate.
We get three triggers with the template:
- Fingerprint has changed
- Certificate expires soon
- Certificate is invalid

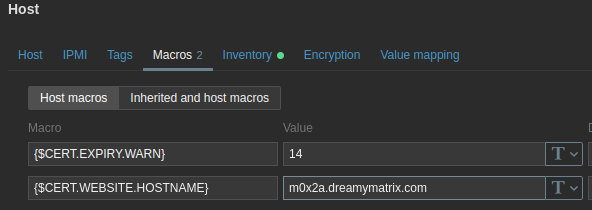
By default, you’ll get a warning that your SSL certificate is about to expire seven days before it actually expires. You can increase this value with a macro {$CERT.EXPIRY.WARN}. If your website uses a TLS/SSL port other than 443, you can specify it using a macro {$CERT.WEBSITE.PORT}.
Configuration
You just need to follow a few simple steps to get the template up and running with the WebCertificate plugin.
- Go to “Data collection” and “Hosts” submenu
- Create a new host (button in the upper right corner)
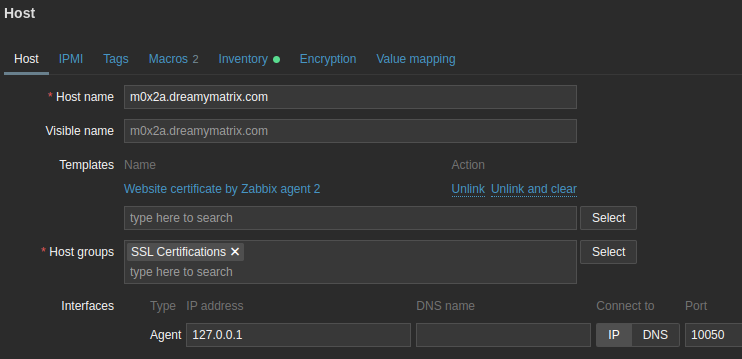
“Host” tab
- “Host name”: Can be anything, doesn’t have to be the URL
- Assign template “Website certificate by Zabbix Agent 2”
- Assign a Host group
- Set “Interfaces” - “Agent” - “IP address” to 127.0.0.1
- So we use Zabbix Agent 2 directly on the Zabbix server
“Macros” tab
- Add your URL to the
{$CERT.WEBSITE.HOSTNAME}macro.
Click ‘add’ to save your configuration, and you are done.